Pre-Purchase Flow
Guide for Non-Buyers
Hey there!
Welcome to the Pre-Purchase Flow: Guide for Non-Buyers.
In this article, we’ll be breaking down each email in a Welcome/Pre-Purchase Series for Non-Buyers.
Before we get started, we should address one big question: how do you find emails to target with a Welcome/Pre-Purchase Series campaign in the first place? That’s a great question!
At DIDO Agency, we collect emails through various subscription forms, including popups, flyouts, and embedded forms.
All three forms are quite similar, so let’s take a closer look at popups as an example.
First, why choose email popups? Are the conversion rates worth it? We think yes!
between 2% to 6%.
up to 18% conversion rates!
So, when used correctly, popups (and other subscription forms) are 100% worth it. Now, what’s the best way to handle popups? DIDO Agency shows popups:

When visitor is exiting your site.

When a site has been loading for 6 to 10 seconds.

When a visitor has scrolled 60% of your site.

A few days after your visitor has been on your site.
Popups (and flyouts or embedded forms) are incredibly helpful to solicit emails (for Welcome/Pre-Purchase Series campaigns and others!), pique customer interest, and maintain engagement. You'll want to start integrating these methods to help you build your contact list.
Aggressive targeting will show a popup 4 days after a visit, but it can be up to 14 days.
Now that you have a better understanding of how you can compile email contacts, let’s jump right into the Welcome/Pre-Purchase Series guide.
The first few emails that your subscribers receive after joining your email list are some of the most important messages of the customer lifecycle. These emails get your subscribers accustomed to engaging with your brand and set the tone of your relationship while outlining expectations.
The Welcome/Pre-Purchase Series is consistently one of the top revenue-producing flows across all of our clients. However, despite their well-performing history, they aren’t exempt from testing and improving! At DIDO Agency, we’re huge believers in consistent testing.
The best and easiest test you can complete in email marketing is A/B testing subject lines, so make sure you’re doing this in your Welcome/Pre-Purchase Series (and all other campaigns, of course!).
In our Welcome/Pre-Purchase Email Series, we're focusing on four main emails:
Email #1 Welcome/Brand Introduction
Email #2
Brand Story
Email #3
Social Proof
Discount
Reminders
Exclusive
Discounts
Community
Building
In the following sections, we’ll go through each email one by one, providing examples along the way to show you what these emails can look like. By including all 6 of these emails in your Welcome/Pre-Purchase Series and implementing DIDO Agency’s tips and tricks for email marketing, you’ll be well on your way to high open rates, stronger revenue generation, and better customer retention.
Welcome email 1
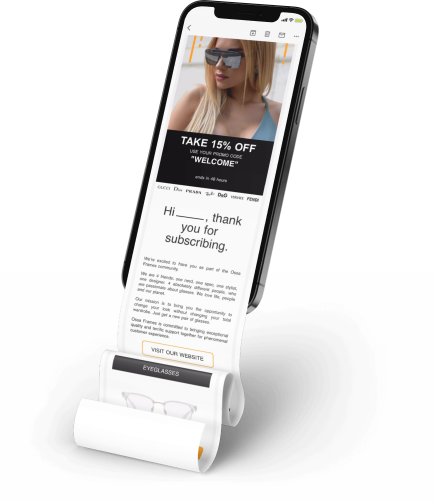
The first email in the Welcome/Pre-Purchase Series should focus on welcoming your new customers and introducing them to your brand. This email should be sent immediately after someone subscribes to your mailing list, so their subscription — and your brand — is fresh in their mind.
The copywriting for your first Welcome email should focus on the following 4 content buckets:
• Welcome
• Brand Introduction
• Thank You
• Discount code (if applicable)
Start off by acknowledging the subscription and welcoming the person to your email list. It’s important to show that you recognize how precious the space in their email inbox is, and express gratitude that you’ve been welcomed onto their roster of brands they’d like to hear from (this is also good for building rapport).
Next, give a short and engaging description of your brand: who you are, when you started, why you started, and what you hope to accomplish. Feel free to personalize this part so they can get a better idea of who you are; let your brand’s tone and personality shine through, but don’t go too in-depth; that’s what Email #2 is for.
Near the end of the email, ensure you thank the subscriber (remember: show gratitude, not desperation), and introduce a discount code if it’s applicable. Discount codes are always a nice touch to a welcome email but definitely aren’t necessary, so do what’s best for your brand.
At this point, you’ll be getting ready to send the email, but you can’t do that without good Subject Lines!
Some Subject Line options for your first Welcome/Brand Introduction email include:
• Welcome to the [BRAND NAME] family!
• You're part of the family now
• Welcome (More info inside!)
• Fantastic — You're in!
• We're glad you're here, [SUBSCRIBER NAME]!
Take a look at the example below of a Welcome/Brand Introduction email that we wrote for OSSA Frames.
While you’re crafting this email and planning the rest of your campaign, it’s important to keep in mind that your first email might outperform the rest… and that’s ok! You can usually expect a 30-50% open rate for this first email, but some of our clients have even seen up to 80% open rates. When receiving the welcome email, people are new to your list and are excited to be joining your brand’s journey. This can lead to the higher open rates we see right off the bat, so make sure to capitalize on that excitement, and start off your relationship strong with this first Welcome/Brand Introduction email.
Welcome email 2
The second email in the Welcome/Pre-Purchase Series should focus on expanding on what the customer can expect from your brand and letting the customer know who you are and what you value. This email should be sent a few days after sending Email #1, so the reader has a day to digest what they learned about you. You’ll want to experiment with a time delay when sending Email #2 to see what works best for your brand and whether a 1-day delay outperforms a 2-day delay or vice versa.
This second email should only be sent to people who do not convert after receiving the first Welcome email.
The copywriting for your second Brand Story email should focus on the following 3 content buckets:
• Brand Story
• Unique Quality Standards
• Benefits of Shopping with Your Company
Much like in Email #1, the Brand Story content bucket focuses on who you are, when and why you started, and what you hope to accomplish, but with more purpose than the introduction you gave in the first email. Not only do they need to know who you are and what you value, but you also need to show why they should care. Do you value the same things they do? Did you get started to fill a gap that they might be experiencing too? Now’s the time to be relatable, approachable, and honest with what your brand is about. Vulnerability is great for rapport.
The second content bucket is why you’re unique compared to other similar brands they might be familiar with. If you’re in the fashion industry, what makes you stand out from other popular brands like Good American, Reformation, or Anthropologie? Maybe you’re selling makeup and beauty… why should they choose you over Sephora or Ulta? Here’s where you introduce your uniqueness and individuality.
• You heard it here first
• Learn more about [BRAND NAME]
• Here's the [BRAND NAME] Story
• The story behind [BRAND NAME]
• Level up your [INSERT NICHE] game
• Why you can't beat the [BRAND NAME] difference
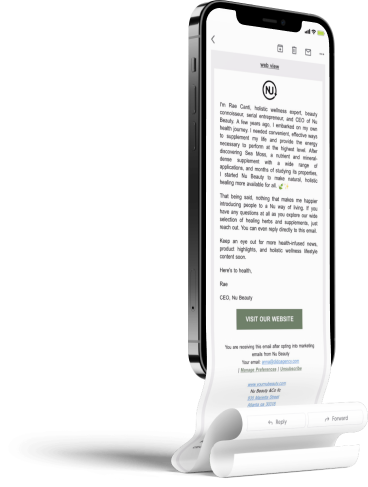
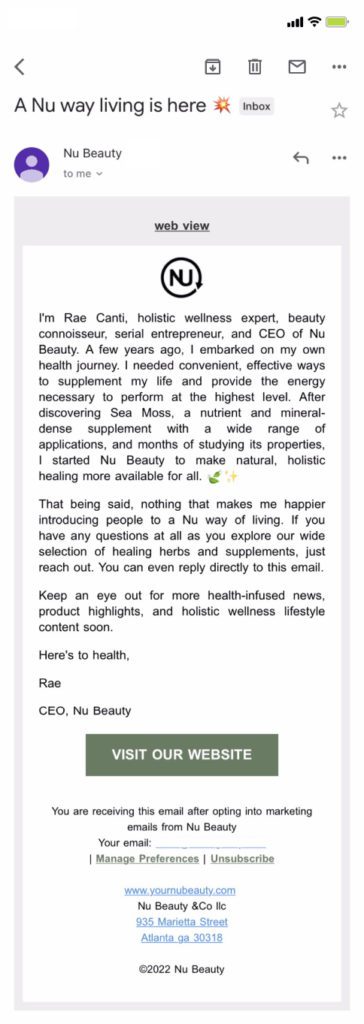
Take a look at the example below of a Brand Story email that we wrote for
NU Beauty.
This second Welcome/Pre-Purchase email is typically expected to underperform compared to Email #1, but again, that is expected. Brand Story emails typically hit a 20% – 40% open rate, but some of our clients see open rates of up to 60%. This second email is your best chance to “wow” your customer if they didn’t convert from the first email, so make sure you’re adding a little extra “sparkle” to this email to keep them enticed. If you don’t hook them by the second email, you risk losing them for good!
Welcome email 3
The third email in the Welcome/Pre-Purchase Series focuses on social proof. Social proof is the idea that people are more likely to try something or do something if other people are doing it. Think about it this way: if you’re looking for a new coffee shop to try, are you going to pick the one with a lineup out the door, or one that’s empty? Probably the one with the lineup… because the line is social proof that it’s good! The same idea applies here. This third email should be sent 2 to 3 days after your Brand Story email.
Again, you will want to experiment with time delays for this email, determining whether a 2-day or 3-day delay for this third email works best for your audience. You should only be sending a third social proof if the recipient did not convert from Emails 1 or 2.
The copywriting for your third Social Proof email should focus on the following 2 content buckets:
• Social Proof (customer reviews, press, celebrity/brand endorsements, retail footprint, etc)
• Display Popular Products
The first content block, the actual Social Proof, can look like a few different things. You might want to highlight some of your favorite customer reviews (we recommend Okendo for collecting these!), with pictures of what they bought, and praise they’re sharing for your brand. If you have celebrity or influencer endorsements, and/or partnerships with other brands, this is another good place to add those. If famous people or big-name brands trust your products, it helps tell people that they can trust you too. Get creative with how you share these, and use visuals where you can.
The second content block should focus on displaying some of your Popular Products or Bestsellers. What products do the people that love your brand like to use? What are your highest-reviewed products? Now’s the time to show off what you’ve got to offer and how many people already like it. Remember, though, there’s a fine line between being proud of your products and coming off boastful; make sure to avoid the latter.
Subject Lines for your third Social Proof email could look like the following:
• Our customers say it best
• Join XXX happy [BRAND NAME] customers!
• [CELEBRITY NAME] said what about [PRODUCT NAME]?!
• We're proud to have ## 5-star reviews on Okendo
• See what people just like you are saying about [PRODUCT NAME]
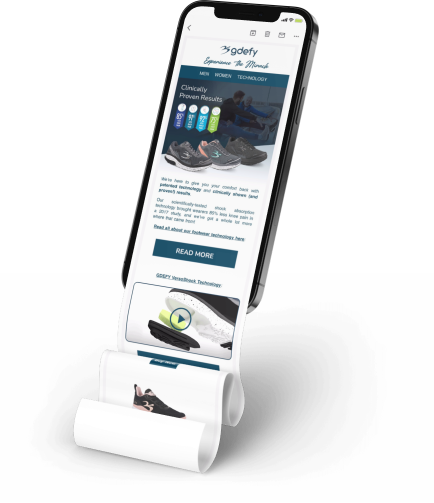
Take a look at the example below of a Social Proof email that we wrote for GDEFY.
For this third Welcome/Pre-Purchase email, you can expect to see a 20% – 35% open rate, although some of our clients see open rates of up to 50%. In this email, you really want to advertise evidence of why your brand deserves their attention, whether it’s in the form of endorsements or strong reviews. Sometimes your brand’s word is not enough and people need to see proof prior to committing or converting. Your job with this email is to give them the proof they need to feel comfortable and excited about moving forward with a purchase.
Welcome email 4
The fourth email in the Welcome/Pre-Purchase Series focuses on building a sense of community and ensuring your consumers feel welcome and included by your brand. When people refer to their brand as a “family” this is what they’re talking about! To help build trust with your users, treat them like a friend or an acquaintance versus just a customer you want a conversion from. Remember: consumers can easily see through insincere communications so don’t say anything you don’t mean or can’t back up.
This email should be sent 3 to 4 days after email 3, but again, experimentation for time delay is key. This email should be sent as a final communication to people who did not convert after the first three emails.
The copywriting for your fourth Community-Focused email should focus on one content bucket:
• The element of community.
This is a great opportunity to highlight how your brand interacts with the community you’ve created. Perhaps you share user-generated content on your social media, host giveaways for products, keep a community newsletter, or host events for your supporters.
These are all great ways to generate a sense of belonging with your brand’s community and can entice shoppers to stick around to join in the activities. When working on your sense of community, remember to keep it in line with your mission, vision, and values. This helps you stay authentic and on-brand while continuing to build trust with your consumers.
Subject Lines for your fourth Community-Focused email could look like the following:
• We’re all in this together
• Let’s get social! Follow us on [PLATFORM NAME]
• Let’s be friends on [PLATFORM NAME]
• [ BRAND NAME] is Here for You
• Join the [BRAND NAME] social event/online event/activity/community
• Want to join the [BRAND NAME] family?
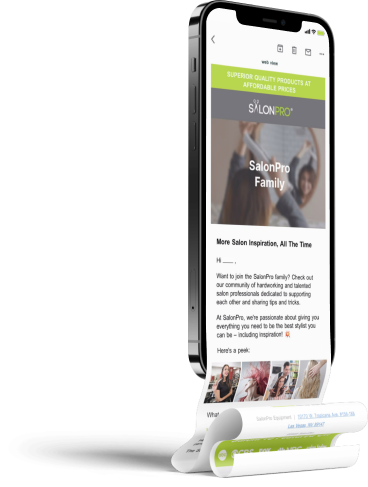
Take a look at the example below of a Social Proof email that we wrote for SalonPro.
For this fourth Welcome/Pre-Purchase email, you can expect an open rate of 20% – 30% although some of our clients see open rates of up to 40%. Again, it’s natural that as this Welcome/Pre-Purchase Series progresses, your open rates will decrease slightly. This email is your second last chance to prove why your brand is worthy of a customer’s conversion, so give this one everything you’ve got before you move on to Email #5.
Welcome email 5
The fifth email in your Welcome/Pre-Purchase series is perhaps the most straightforward. In this email, you’re pulling out all the stops to try for the last time to get the conversion by offering a discount. Email #5 is the absolute last chance to try and get the conversion, so we want to pull in a little bit of everything we’ve already talked about: the benefits of your brand, social proof, and a sense of community.
This email should be sent 2 to 3 days after your Social Proof email, but as with all of the other emails in this flow, you’ll want to experiment with send-out time to see what works best for your audience.
The copywriting for your fifth email should focus on the following content buckets:
• Discount/Offer
• Brand Introduction Reminder AND/OR Benefits/Brand Story AND/OR Social Proof
• Discount Reiteration
The most important think to remember when writing a discount email is that all the content buckets should be very, very short; some discount emails don’t even need copy if you’ve got a strong visual.
When introducing the discount, you’ll want to preface why anyone should care about savings. Is it exclusive? Is it your biggest discount yet? Is it savings on an item that’s never usually on sale? Discounts are great, but greating a sense of urgency and exclusivity makes any deal a little sweeter.
For the middle content bucket, keep the copy extremely short and sweet. This consumer has already received the first 4 emails in the series, so they don’t need a novel reintroducing who you are or what you stand for. However, since this is your last chance to hook them on a sale, you’ll want to remind them about key parts of your brand. This should only be a sentence or two long and can include a brand introduction reminder, benefits/brand story, and social proof, only two of the three topics, or even just one — whatever you think is most appealing and relevant.
Subject Lines for your discount-focused email could look like the following:
• Exclusive [BRAND NAME] savings inside
• Open me for XX% off your purchase!
• How does XX% off your purchase sound?
• Shop and save XX% at [BRAND NAME]
• Enjoy an exclusie XX% discount, just for you!
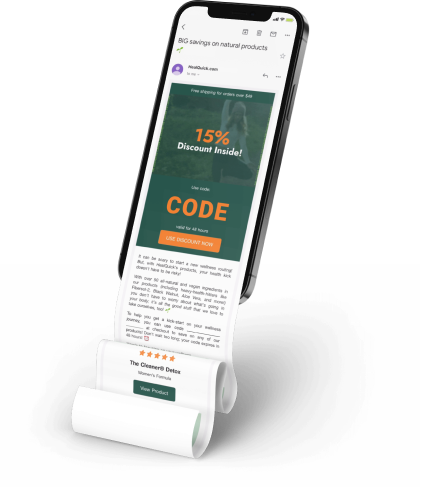
Take a look at the example below of a Discount email that we wrote for H.e.a.l. Quick.
For a discount-focused email, you can expect an open rate of 25% – 35% although some of our clients see open rates of up to 65%. This email is your last opportunity to try and convince your consumer that your brand is worth purchasing from, so make sure you give the best discount you can, keep copy short and sweet, and make the email visually appealing and memorable. Don’t waste this chance to hook your reader!
Welcome email 6
The sixth and final email in the Welcome/Pre-Purchase Series is an extremely short and to-the-point email: a discount reminder. This email should lean heavily on a sense of urgency, encouraging the purchaser to convert before it’s too late and their savings are gone.
The copywriting for your discount reminder email should focus on the following 2 content buckets:
• Discount Reminder
• Urgency
This email should have very little copy, or if you have a strong design, it doesn’t need to have copy at all.
Whether you’re targeting these content buckets through word or through design, you should repeat the discount information including the percentage of savings and the discount code (if applicable), and add a sense of urgency. Many companies accomplish the “urgency” aspect with a visual countdown or timer on the email.
Subject Lines for your discount reminder email could look like the following:
• Last chance to save XX%!
• Use your [BRAND NAME] discount before it expires!
• Your XX% discount expires in XX hours!
• Use your XX% or lose it! Shop now
• Last call! Your exclusive discount expires soon
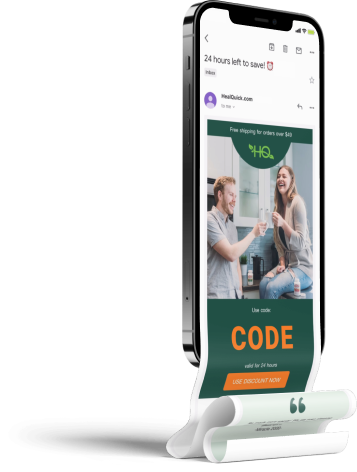
Take a look at the example below of a Discount reminder email that we wrote for H.e.a.l. Quick.
This sixth Welcome/Pre-Purchase Series email usually generates an open rate of 20%-30%, but some clients see open rates of up to 45%. Keep this email short, sweet, and as graphic as possible to achieve the best results. Keep this email short, sweet, and as graphic as possible to achieve the best results.
We hope you enjoyed this Welcome/Pre-Purchase Series Guide and learned a few things that you can apply to your future campaigns. Keep in mind that the Welcome/Pre-Purchase Series for Non-Buyers is consistently one of the top revenue-producing flows across all of our clients, providing an incredible opportunity to showcase your brand and your products. Don’t overlook this as an opportunity to generate revenue you might have missed out on otherwise.
Here’s to a future with more conversions,
DIDOTeam
P.S. If you don’t already, give us a follow on Twitter. Can’t wait to continue crushing the email marketing game with you all!
